Food Photography: How to Make Dishes Look Delicious in 2024
Food photography is the art and science of making dishes look as delicious on camera as they taste in reality. In an era where we eat with our eyes first—scrolling through Instagram, browsing restaurant menus online, or deciding which recipe to cook—compelling food imagery has become essential for restaurants, food bloggers, recipe developers, and home cooks alike.
But capturing mouthwatering food photos requires more than just pointing a camera at a plate. Steam needs to be visible, textures must pop, colors should seduce, and every element must work together to trigger hunger and desire. Professional food photographers combine technical expertise in lighting and camera settings with artistic skills in styling and composition to create images that make viewers want to reach through the screen.
Whether you're photographing dishes for a restaurant menu, building a food blog, documenting family recipes, or simply want your Instagram food posts to get more engagement, this comprehensive 3,500-word tutorial will teach you everything you need to know about food photography. From equipment essentials and lighting techniques to advanced styling secrets and post-processing workflows, you'll learn how to make any dish look absolutely irresistible.
Table of Contents
- The Psychology of Appetizing Food Photography
- Essential Equipment for Food Photography
- Understanding Natural Light for Food
- Artificial Lighting Setup for Consistent Results
- Food Styling: Making Dishes Camera-Ready
- Composition Techniques for Food Photography
- Props, Backgrounds, and Table Settings
- Shooting Different Types of Food
- Post-Processing for Mouthwatering Results
- Building a Food Photography Business
- FAQ
The Psychology of Appetizing Food Photography
Great food photography triggers psychological responses that create desire. Understanding these principles helps you create more compelling images.
What Makes Food Look Delicious?
Visual Texture: We expect specific textures from food—crispy, creamy, juicy, flaky. Your photos must communicate these textures through highlights, shadows, and detail.
Freshness Cues: Glossy surfaces, vibrant colors, and natural irregularities signal freshness. Dull, uniform, or wilted elements suggest stale, processed food.
Generosity: Full plates and abundant portions create satisfaction. Sparse arrangements can look elegant but may not trigger appetite.
Steam and Movement: Visible steam, dripping sauces, and falling sprinkles add life and action to static images, suggesting the food is fresh and hot.
Color Psychology:
- Red and orange: Stimulate appetite and excitement
- Green: Suggests freshness, health, and natural ingredients
- Yellow: Evokes happiness and comfort
- Brown: Communicates richness, chocolate, and warmth
- White: Implies purity, simplicity, and elegance
Triggering Emotional Responses
Nostalgia: Familiar comfort foods trigger positive memories and emotional connections
Aspirational Living: Beautiful settings suggest the good life and special occasions
Health and Wellness: Fresh ingredients and clean styling appeal to health-conscious viewers
Indulgence: Rich, decadent presentations trigger permission for treats and celebrations
Essential Equipment for Food Photography
You don't need professional studio gear to create stunning food photography, but quality equipment expands your creative possibilities.
Camera Bodies
Smartphones:
Modern flagship phones capture excellent food photos. Computational photography features like portrait mode and night mode extend shooting capabilities.
Recommended: iPhone 15 Pro, Google Pixel 8 Pro, Samsung Galaxy S24 Ultra
iPhone 15 Pro → — Affiliate link
Mirrorless/DSLR Cameras:
For maximum control and image quality:
- Sony A7 IV: Excellent low light, fast autofocus
- Canon EOS R6 Mark II: Intuitive controls, great color science
- Nikon Z6 II: Robust build, excellent dynamic range
- Fujifilm X-T5: Beautiful film simulations perfect for food
Sony A7 IV → — Affiliate link
Lenses for Food Photography
Macro Lens (90mm-105mm equivalent):
Essential for detail shots—texture of bread crust, droplets on fruit, sprinkle close-ups.
Recommended:
- Sony FE 90mm f/2.8 Macro G
- Canon RF 100mm f/2.8L Macro
- Nikon Z MC 105mm f/2.8 VR S
- Tamron 90mm f/2.8 Di III Macro (budget option)
Canon RF 100mm Macro → — Affiliate link
Standard Zoom (24-70mm):
Versatile for overhead shots, table scenes, and environmental portraits.
50mm Prime:
The "nifty fifty" offers beautiful bokeh and natural perspective at an affordable price.
Tripods and Support
Tripod: Essential for consistent framing and low-light shooting
- Manfrotto 190 series: Reliable, versatile
- Peak Design Travel Tripod: Compact, innovative design
- Neewer Carbon Fiber: Budget-friendly carbon option
Overhead Rig: For flat lay and top-down shots
- Manfrotto 055 with horizontal column
- Overhead camera mounts
- C-stands with crossbar (studio setup)
Manfrotto 190 Tripod → — Affiliate link
Essential Accessories
Reflectors: Bounce light back into shadows for even illumination
- 5-in-1 reflector discs (gold, silver, white, black, translucent)
- DIY foam board options
Diffusers: Soften harsh light
- Fabric diffusers for windows
- Softbox attachments for artificial lights
- DIY parchment paper solutions
Color Checkers: Ensure accurate colors
- X-Rite ColorChecker Passport
- White balance cards
Neewer 5-in-1 Reflector → — Affiliate link
Understanding Natural Light for Food
Natural light creates the most appetizing food photography for most situations. Here's how to harness it.
The Ideal Window Setup
North-Facing Windows (Northern Hemisphere):
Provide consistent, soft light throughout the day without direct sun. Ideal for controlled food photography.
South-Facing Windows:
Offer bright light but require diffusion during midday. Best for morning and late afternoon shooting.
East-Facing Windows:
Beautiful warm morning light. Shoot early for golden, directional illumination.
West-Facing Windows:
Warm afternoon and evening light. Great for dinner dishes and moody atmospheres.
Working with Different Weather
Overcast Days:
Perfect for beginners—soft, even light with minimal shadows. Colors appear true and appetizing.
Sunny Days:
Use diffusion (sheer curtains, diffusion fabric) to soften harsh shadows. Shoot during golden hour for warm, directional light.
Golden Hour:
The hour after sunrise and before sunset provides warm, golden light that makes food glow. Perfect for capturing steam and creating mood.
Managing Harsh Light
Diffusion Solutions:
- Sheer white curtains over windows
- Professional diffusion panels
- DIY parchment paper or white bed sheets
- Shoot in open shade (near a bright window but not directly in sun)
Fill Light:
Use white foam boards or reflectors to bounce light back into shadows, reducing contrast while maintaining dimension.
Directional Light Techniques
Side Lighting (45-90 degrees):
Creates dimension, texture, and appetizing shadows. Best for most food photography.
Backlighting:
Illuminates steam, smoke, and translucent ingredients (citrus, beverages). Creates glowing, appetizing effects.
Front Lighting:
Even illumination but can appear flat. Use for editorial consistency and technical accuracy.
Artificial Lighting Setup for Consistent Results
When natural light isn't available or consistent, artificial lighting enables professional food photography anytime.
Continuous vs. Strobe Lighting
Continuous LED Lights:
- Pros: What you see is what you get, easier for beginners, video-friendly
- Cons: Less power than strobes, can generate heat
- Best for: Beginners, video content, real-time adjustments
Strobe/Flash Lighting:
- Pros: More power, freeze motion, longer bulb life
- Cons: Requires modeling lights or experience to visualize results
- Best for: Professional studios, motion-freezing, high-volume work
Recommended Lighting Kits
Budget Starter Kit ($100-200):
- Neewer 2-Pack Dimmable 5600K LED Video Light
- Includes stands and basic diffusion
Mid-Range Kit ($300-600):
- Godox SL-60W LED Video Light (2 units)
- Softbox modifiers
- Light stands
Professional Kit ($1000+):
- Aputure 120D or 300D Mark II lights
- Light Dome modifiers
- C-stands with grip equipment
Godox SL-60W LED Light → — Affiliate link
The Classic Two-Light Setup
Key Light:
Position at 45 degrees to your subject, slightly above. This is your main illumination source.
Fill Light (or Reflector):
Opposite the key light, at lower intensity or using a reflector. Reduces harsh shadows while maintaining dimension.
Optional Rim Light:
Behind the subject, creates separation from background and highlights edges.
Light Modifiers for Food
Softboxes: Large, soft light perfect for most food photography
Strip Boxes: Create dramatic highlights and elongated catchlights
Grids: Control light spill for precise illumination
Barn Doors: Shape and direct light exactly where needed
Neewer Softbox Kit → — Affiliate link
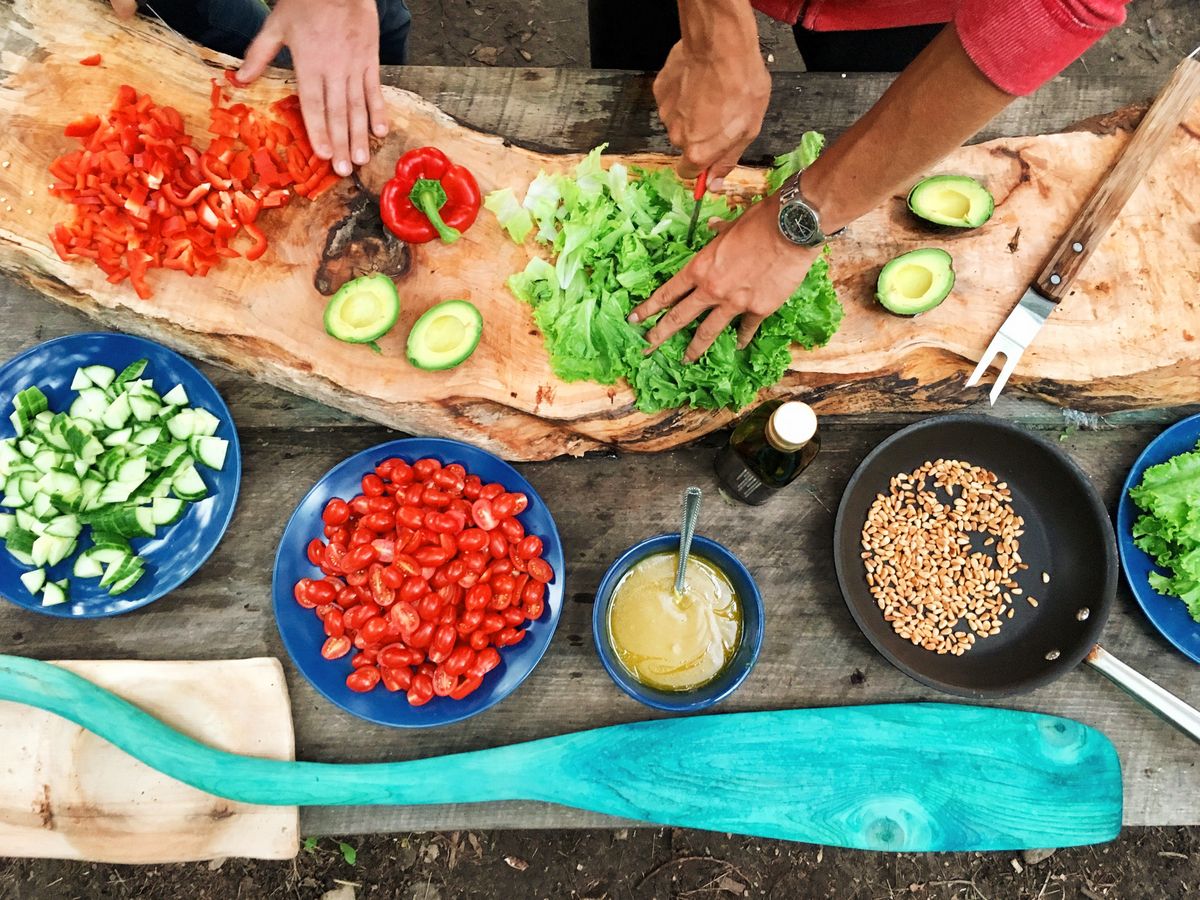
Food Styling: Making Dishes Camera-Ready
Professional food stylists use tricks to make dishes look their best. Here are industry secrets for stunning food photography.
Preparation Techniques
Cook to Camera, Not to Taste:
Food for photography often needs different treatment than food for eating:
- Undercook vegetables slightly for vibrant color and structure
- Sear proteins longer for dramatic grill marks
- Cook pasta just to al dente for perfect shape
Mise en Place:
Have everything prepared before cooking. Food looks best immediately after preparation—steam, gloss, and structure degrade quickly.
Multiple Versions:
Prepare several portions. The first might not be perfect, and some dishes can't be "fixed" once assembled.
Enhancing Freshness
Brushing with Oil:
Apply vegetable oil with a pastry brush to create gloss and prevent drying. Works for grilled meats, roasted vegetables, and bread.
Water Spritzing:
Lightly mist produce to create fresh dewdrops. Use a fine spray bottle for controlled droplets.
Steam Enhancement:
- Microwave wet cotton balls behind food
- Use handheld steamers just before shooting
- Capture steam in backlighting for visibility
Sauce and Garnish Placement
Sauces:
- Use squeeze bottles for precise drizzle patterns
- Add sauces just before shooting to prevent absorption
- Create contrast—dark sauce on light food, light sauce on dark food
Garnishes:
- Place herbs with intention, not randomly
- Use odd numbers for visual appeal
- Consider height and texture contrast
- Edible flowers add elegance and color
Pro Styling Tricks
Toothpick Supports:
Hold ingredients in place discreetly. Remove in post-processing or crop out.
Dusting Powders:
Cocoa powder, powdered sugar, or spices add visual texture and interest to finished dishes.
Grill Marks:
Use a hot skewer or heated metal grill marks tool to add perfect char marks.
Ice Substitutes:
Fake ice cubes don't melt and look perfect indefinitely. Acrylic ice works best.
Acrylic Ice Cubes for Photography → — Affiliate link
Common Food Substitutes
When real food doesn't photograph well:
Mashed Potatoes: Substitute for ice cream (doesn't melt)
Glue: Diluted white glue substitutes for milk or cereal liquid
Cardboard: Supports layers in cakes and sandwiches
Motor Oil: Substitutes for syrup (perfect viscosity)
Shaving Cream: Whipped cream substitute (holds shape)
Note: Always disclose when using non-edible substitutes in commercial food photography.
Composition Techniques for Food Photography
Strong composition transforms good food photography into great imagery.
Camera Angles
Overhead (90 degrees):
- Best for: Flat dishes (pizza, salads, charcuterie), tablescapes, ingredient layouts
- Creates graphic, design-focused images
- Shows arrangement and pattern
45-Degree Angle:
- Best for: Most plated dishes, layered foods, showing depth
- Mimics natural seated viewing position
- Shows both top and side of food
Eye Level (0 degrees):
- Best for: Layered desserts, burgers, stacked foods
- Creates dramatic, immersive perspective
- Shows height and structure
Close-Up/Macro:
- Best for: Texture detail, ingredients, garnishes
- Creates abstract, artistic images
- Highlights craftsmanship
The Rule of Thirds
Place your main subject off-center, at intersection points of a 3x3 grid. This creates dynamic, engaging compositions rather than static center-placed subjects.
Leading Lines and Curves
Use natural lines in your composition to guide the viewer's eye:
- Utensil placement
- Sauce drizzles
- Table edges
- Ingredient arrangement
Negative Space
Don't fill the frame completely. Breathing room around subjects creates sophistication and draws attention to the hero dish.
Layering and Depth
Create visual interest through layering:
- Foreground elements (napkins, utensils)
- Mid-ground (main subject)
- Background (context, setting)
Use shallow depth of field (wide apertures like f/2.8 or wider) to blur backgrounds and emphasize the main dish.
Framing
Use natural frames within your composition:
- Napkins around plates
- Hands holding dishes
- Table edges
- Ingredients surrounding the main dish
Props, Backgrounds, and Table Settings
Thoughtful props elevate food photography from snapshots to professional imagery.
Essential Backgrounds
Natural Wood:
- Cutting boards (various stains and grains)
- Reclaimed wood surfaces
- Butcher block
- Live edge slabs
Wood Photography Backdrops → — Affiliate link
Stone and Tile:
- Marble slabs (real or contact paper)
- Slate cheese boards
- Ceramic tiles
- Concrete surfaces
Fabrics:
- Linen napkins (various colors)
- Burlap for rustic appeal
- Cotton tea towels
- Vintage textiles
Paper and Surfaces:
- Seamless paper rolls
- Painted canvases
- Chalkboards
- Vintage book pages
Prop Categories
Tableware:
- Plates in various sizes, shapes, and colors
- Bowls (shallow for styling, deep for soups)
- Serving boards and platters
- Vintage and modern pieces for different moods
Stone Lain Dinnerware Set → — Affiliate link
Utensils:
- Vintage silverware for character
- Modern minimalist pieces for clean looks
- Specialty serving pieces
- Wooden spoons and spatulas
Textiles:
- Linen napkins (most versatile)
- Table runners
- Dish towels
- Placemats
Decorative Elements:
- Fresh herbs and produce
- Dried flowers and botanicals
- Candles for ambiance
- Recipe cards and handwritten notes
Color Coordination
Monochromatic: Various shades of one color create sophisticated, harmonious images
Complementary: Opposite colors on the color wheel (blue/orange, red/green) create vibrant contrast
Neutral with Pop: Neutral backgrounds with colorful food as the star
Seasonal Palettes: Coordinate with seasonal colors for timely, relevant content
Building Your Collection
Start With Neutrals:
White, gray, beige, and wood tones work with everything
Add Color Gradually:
Choose 2-3 accent colors that complement your brand or style
Mix Textures:
Combine smooth ceramics with rough wood, soft linens with hard stone
Source Creatively:
- Thrift stores for unique vintage pieces
- Restaurant supply stores for professional quality
- Estate sales for character pieces
- Your own kitchen for authentic elements
Shooting Different Types of Food
Different cuisines and dishes require specific approaches to food photography.
Soups and Stews
Challenges: Flat appearance, poor texture visibility, steam condensation
Solutions:
- Shoot at 45-degree angle to show depth
- Garnish with fresh herbs, cream drizzle, or croutons
- Use dark bowls to create contrast
- Capture steam with backlighting
Baked Goods
Challenges: Dull crusts, flat appearance, crumbly textures
Solutions:
- Brush with melted butter or oil for gloss
- Show cross-sections to reveal texture
- Include crumbs and mess for authenticity
- Shoot warm for visible steam
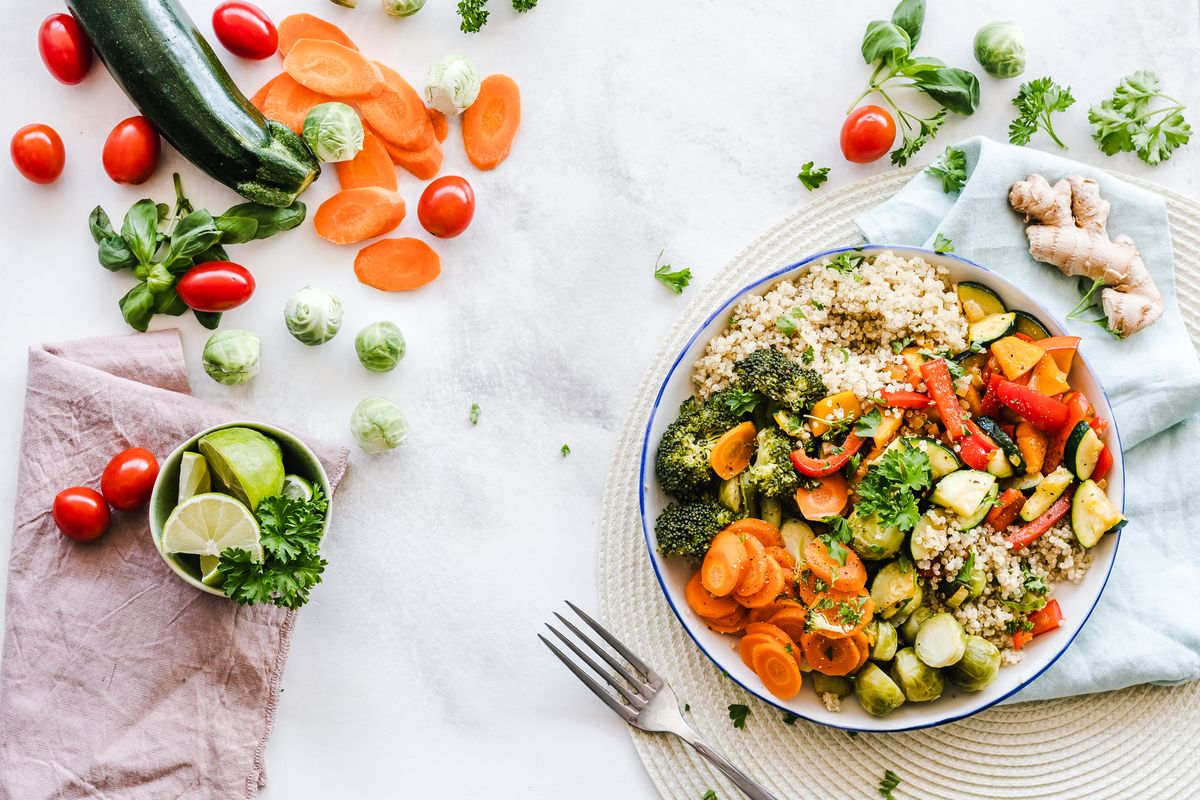
Salads and Fresh Dishes
Challenges: Wilting, flat appearance, busy compositions
Solutions:
- Build height by arranging ingredients vertically
- Use large, shallow bowls for separation
- Add crunch elements (nuts, seeds, croutons)
- Shoot quickly after dressing application
Grilled and Roasted Meats
Challenges: Dry appearance, poor color, lack of juiciness
Solutions:
- Brush with oil for shine
- Create perfect grill marks with hot skewers
- Show cross-sections for doneness
- Include juices and sauces
Desserts
Challenges: Melting, messy appearance, difficult textures
Solutions:
- Use mashed potato ice cream substitutes for styled shots
- Capture dripping chocolate and caramel
- Show layers and textures through cross-sections
- Use fake whipped cream for stable shots
Beverages
Challenges: Reflections, condensation, lack of visual interest
Solutions:
- Use glycerin/water mix for perfect condensation droplets
- Add garnishes (citrus, herbs, fruit)
- Capture pouring and splashing action
- Use backlighting for transparency
Glycerin for Fake Condensation → — Affiliate link
Dark and Moody Foods
Challenges: Loss of detail, flat appearance
Solutions:
- Use directional light for texture and dimension
- Add shine highlights with oil brushing
- Include negative space for drama
- Embrace shadows rather than fighting them
Post-Processing for Mouthwatering Results
Even perfectly styled food photography benefits from thoughtful editing.
RAW vs. JPEG
Shoot RAW when:
- You need maximum editing flexibility
- White balance is challenging (mixed lighting)
- You're delivering professional work
- Exposure may need significant adjustment
Shoot JPEG when:
- Speed is essential (event photography)
- Storage space is limited
- You're confident in camera settings
- Quick turnaround required
Essential Adjustments
Exposure and Contrast:
- Ensure highlights aren't blown out (loss of detail in bright areas)
- Lift shadows to reveal detail without making image flat
- Add contrast for punch, reduce for airy, light looks
White Balance:
- Neutral grays should appear neutral, not warm or cool
- Slightly warm tones often make food more appetizing
- Use white balance eyedropper on neutral areas
Color Adjustments:
- Boost saturation for vibrant, appetizing colors
- Use HSL sliders to target specific colors (brighten greens, deepen reds)
- Add clarity/texture for enhanced detail
Selective Adjustments:
- Dodge (lighten) areas you want to emphasize
- Burn (darken) distracting elements
- Use radial filters to draw attention to the hero dish
Food-Specific Editing Techniques
Enhancing Steam:
- Use radial filters to increase exposure and clarity on steam
- Add slight warmth to suggest heat
- Clone stamp additional steam if needed
Sharpening:
- Apply appropriate sharpening for web or print
- Mask sharpening to affect only key areas
- Avoid over-sharpening which creates halos
Removing Distractions:
- Clone out unwanted crumbs, spots, or imperfections
- Clean up backgrounds for minimalist looks
- Remove toothpicks and supports used during styling
Presets and Consistency
Develop a Style:
Create consistent editing presets for cohesive Instagram feeds or portfolios. Common food photography styles include:
- Bright and Airy: High key, low contrast, pastel tones
- Dark and Moody: Low key, high contrast, rich colors
- True to Life: Minimal editing, accurate colors
- Vintage/Film: Warm tones, reduced saturation, grain
Food Photography Lightroom Presets → — Affiliate link
Building a Food Photography Business
Turn your food photography skills into income with these strategies.
Revenue Streams
Restaurant Photography:
- Menu photography
- Social media content packages
- Website imagery
- Marketing materials
Food Brand Work:
- Packaged goods photography
- Ingredient suppliers
- Kitchen equipment brands
- Food delivery services
Editorial and Publishing:
- Cookbook photography
- Magazine features
- Recipe development and photography
- Online publications
Stock Photography:
- Food stock image libraries
- Print-on-demand products
- Recipe card designs
Teaching and Content:
- Online courses
- YouTube tutorials
- Ebooks and guides
- Workshops and mentoring
Building Your Portfolio
Personal Projects:
- Cook and photograph dishes regularly
- Develop signature styles
- Create concept series (seasonal ingredients, comfort foods)
Collaborations:
- Work with emerging chefs
- Partner with food bloggers
- Collaborate with stylists
Test Shoots:
- Approach restaurants with portfolio proposals
- Create mock campaigns for dream brands
- Document local food culture
Marketing Your Services
Social Media:
- Instagram as primary portfolio platform
- Pinterest for traffic and discovery
- TikTok for behind-the-scenes content
- LinkedIn for commercial connections
Website:
- Clean, image-focused portfolio
- About page with your story
- Services and pricing information
- Contact and inquiry forms
Networking:
- Attend food industry events
- Join photographer associations
- Collaborate with other creatives
- Build relationships with PR agencies
Pricing Your Work
Day Rate: Typical range $800-$3,000+ depending on experience and market
Per Image: $75-$500+ per final image
Licensing: Additional fees for extended usage rights
Expenses: Charge separately for assistants, props, location fees, and food costs
Squarespace for Portfolio Websites → — Affiliate link
FAQ
What camera settings should I use for food photography?
Start with: Aperture priority mode, f/2.8 to f/5.6 (balance between sharpness and background blur), ISO as low as possible (100-400 ideally), and white balance set to match your light source (daylight, cloudy, or custom). Use manual focus for precise control, especially with macro lenses.
How do I make food look fresh in photos?
Brush with vegetable oil for shine, mist with water for dewdrops, use backlighting to capture steam, shoot quickly after preparation, and undercook vegetables slightly for vibrant color. Have everything ready before cooking so you can shoot immediately when the dish is ready.
What's the best lighting for food photography?
Soft, diffused natural light from a north-facing window is ideal for most food photography. For artificial light, use continuous LED lights with softbox modifiers at 45-degree angles. Avoid direct overhead lighting and harsh shadows that create unappetizing contrast.
Do I need expensive equipment for food photography?
No—you can create stunning food photos with a smartphone and natural light. Invest gradually: start with a basic reflector, then add a tripod, then consider upgrading to a dedicated camera and lenses. Technique matters more than equipment.
How do I style food for photos?
Use the "less is more" approach—don't overcrowd the plate. Create height and dimension, add texture with garnishes, use odd numbers of elements, and consider the rule of thirds for placement. Brush with oil for shine and add fresh herbs just before shooting.
What angle should I shoot food from?
The 45-degree angle works for most dishes as it mimics natural viewing. Overhead shots are best for flat foods like pizza or table spreads. Eye level works for layered foods like burgers. Shoot multiple angles to have options.
How do I capture steam in food photos?
Use backlighting to make steam visible against a dark background. Shoot when food is very hot. You can enhance steam with a handheld steamer or wet cotton balls microwaved behind the dish. Shoot quickly—steam disappears fast.
What props do I need for food photography?
Start with: neutral linen napkins, wooden cutting boards, white ceramic plates, vintage silverware, and basic glassware. Add gradually based on your style—colored ceramics, textured backgrounds, seasonal elements. Source from thrift stores for unique, affordable pieces.
How do I edit food photos?
Adjust exposure and white balance first. Boost contrast and saturation carefully—food should look appetizing, not unnatural. Use selective adjustments to brighten the hero dish. Sharpen appropriately and remove distractions. Develop presets for consistent style.
Can I make money with food photography?
Yes—food photography offers multiple revenue streams: restaurant menu photography, brand partnerships, cookbook projects, stock photography, teaching, and editorial work. Build a strong portfolio, develop a signature style, and network within the food industry.
Conclusion: Your Delicious Photography Journey
Food photography combines technical precision with creative artistry, science with intuition, planning with spontaneity. The images you create don't just document dishes—they tell stories, evoke emotions, and inspire action.
Remember these essential principles:
- Light is everything: Master lighting before investing in expensive cameras
- Freshness matters: Shoot quickly, prepare thoroughly, style intentionally
- Composition creates impact: Study arrangements, practice angles, develop eye
- Authenticity connects: Perfect technique serves real stories and genuine moments
- Consistency builds recognition: Develop your signature style across all work
Your first food photos won't be perfect, and that's exactly as it should be. Every shoot teaches something new—about light, about composition, about the alchemy of making food look as delicious as it tastes.
The world is hungry for beautiful food imagery. Restaurants need menus that entice. Bloggers need content that engages. Brands need stories that sell. And home cooks need inspiration that gets them into the kitchen.
Pick up your camera, prepare something beautiful, and start shooting. Your food photography journey begins with a single frame.
Get Essential Food Photography Props → — Affiliate link
Last updated: March 17, 2024. This post contains affiliate links, meaning we may earn a small commission at no extra cost to you. We only recommend products we genuinely believe in.
Exit-Intent Popup Configuration
popup_config:
  trigger: exit_intent
  title: "Hungry for Better Food Photos?"
  subtitle: "Download our free Food Photography Starter Kit with lighting diagrams, prop lists, and 50+ styling ideas for every cuisine!"
  cta_text: "Get Free Starter Kit"
  cta_color: "#F59E0B"
  success_message: "Check your email for your Food Photography Starter Kit!"
  delay_seconds: 0
  show_once_per_session: true
  mobile_trigger: scroll_80_percent
Internal Linking Suggestions
- Link to flat lay photography tutorial
- Link to restaurant marketing guide
- Link to Instagram food content strategies
- Link to color theory for photographers
- Link to photography equipment basics